


Tech Specs
A5+ Home Music System
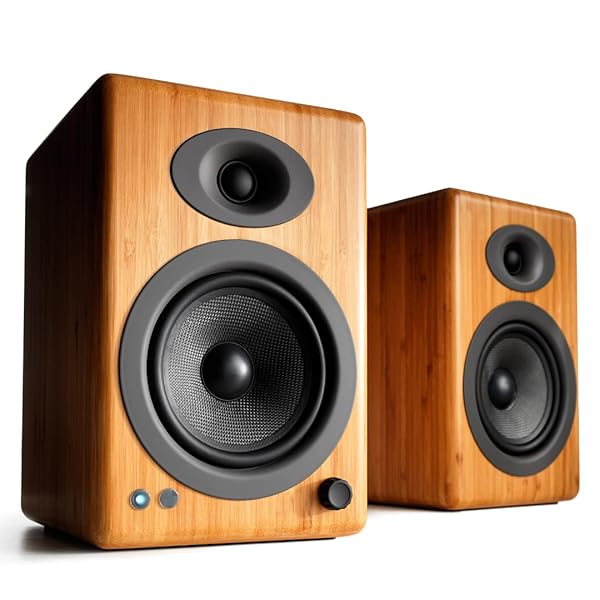
The foundation of the Audioengine family, the A5+ Home Music System will fit on your shelf, but fill up the room. And with no network setup or passwords to enter it doesn’t get any easier—or sound any better—than this. From hip-hop to heavy metal, symphonic to spoken word, the A5+ is a master of all trades.
Pro Tip Pair the A5+ Classic with the Audioengine D1 DAC for desktop applications. This bypasses your computer’s lower quality audio components, with the D1 DAC significantly enhancing the sound quality.
Technical Specifications

General Specifications
Type
Powered speaker system
Amplifier Type
Class AB
Rated Power Output:
50W RMS per channel (measured in compliance with 16 C.F.R. § 432.3)
Peak Power Output: 75W per channel (AES)
Total Peak Power Output: 150W (AES)
Drivers
5″ aramid fiber woofers
0.75″ silk dome tweeters
Inputs
3.5 mm stereo mini-jack, RCA L/R
Outputs
RCA variable line-out, USB (power/charge)
Input Voltages
115/240 V, 50/60 Hz manually switchable
SNR
>95 dB (typical A-weighted)
THD+N
Less than 0.05% at all power settings
Crosstalk
<50 dB
Frequency Response
50 Hz-22 kHz ±1.5 dB
Frequency Response w/ Bass Reduction Switch selected
N/A
Analog Input Impedance
N/A
Nominal Impedance
N/A
Input Impedance
10K ohms unbalanced
Crossover Frequency
N/A
Protection
Output current limiting, thermal over-temperature, power on/off transient protection, replaceable external main fuse
Power Consumption
Idle: 10 W
Mute: 6 W
Sleep: 4 W
Standby Consumption
N/A
Phase
N/A
Recommended Amplifier Power
N/A
Battery Life
N/A
Battery Charge Time
N/A
Bluetooth Specifications
Internal D/A Converter
N/A
Internal BT Receiver
N/A
Input Bit Depth
N/A
Bluetooth Receiver Type
N/A
Supported Codecs
N/A
Supported Bluetooth Profiles
N/A
Wireless Operation Range
N/A
Input Data Rate
N/A
Wireless Latency
N/A
Power
Connector Type
Standard USB
USB Device Class
USB 1.1 or above
Input Bit Depth
N/A
Input Sample Rate
N/A
Headphone Amp Specifications
Headphone Amp Type
N/A
Full-scale Headphone Output Level
N/A
Output Impedance
N/A
Recommended Headphone Impedance Level
N/A
Optical Specifications
Internal D/A converter
N/A
Input Bit Depth
N/A
Sample Rate
N/A
Weights And Measures
Dimensions (HWD)
Left (active) – 10.75″ (27 cm) x 7″ (18 cm) x 9″ (23 cm)
Right (passive) – 10.75″ (27 cm) x 7″ (18 cm) x 7.75″ (20 cm)
Weight
Left (active) – 15.4 lb (7 kg)
Right (passive) – 9.6 lb (4.4 kg)
Total Shipping Weight
31 lb (14 kg)
Shipping Box Dimensions (LWH)
22″ (56 cm) x 11.5″ (29 cm) x 15″ (38 cm)
Environmental Requirements
Operating temperature: 32 degrees F to 95 degrees F
Non-operating temperature: -4 degrees F to 113 degrees F
Relative humidity: 5 – 95% non-condensing
Materials And Construction
0.5″ (13 mm) thick MDF cabinets
5″ (130 mm) aramid fiber woofers with advanced voice coils
0.75″ (20 mm) silk dome tweeters with neodymium magnets
Toroidal power transformer
Cabinets
To minimize unwanted resonances and distortion, Audioengine cabinets have thick high-resin MDF walls with extensive internal bracing. Heavy internal sound-damping material is used to reduce unwanted sound reflections inside the cabinet. All cabinet edges are rounded which look great and reduce high-frequency diffraction effects on the front baffles. The A5+ cabinet contains tuned, rear-port slots.
Furniture Grade Finishes
The A5+ cabinets are available in several handsome finishes, including bamboo veneers as well as satin black and high-gloss white paint, offering a wide choice for complementing room furnishings.
Custom Components
Audioengine designs and manufactures our own tweeters, woofers, and other critical components. In other words, these are not “box built” speakers with off-the-shelf parts but custom-designed to our specifications. What we do not fabricate directly in our factory we have made to our designs (parts such as transformers, magnets, and wiring harnesses, for example). The cabinets, drivers, bass port designs, amplifiers, and crossovers are all painstakingly tuned together for each Audioengine model. This, in turn, makes for a much more efficient system that requires much less power than passive speakers and a separate integrated amplifier or similar A/V components.
Based On Studio Monitor Designs
Studio monitor speakers are used by producers and engineers in recording and production studios. They are designed with a theoretical flat frequency response which allows the engineer to create a final mix in such a way that the recorded music will sound good on most other speakers. Although Audioengine speakers are not designed to be up-close “nearfield” studio monitors, we do carry over much of the same higher-end technology, components, and design philosophy for all Audioengine speaker systems.
Efficient Integrated Design
The speaker cabinets, drivers, innovative bass port designs, amplifiers, and passive crossovers are all critically tuned together for each Audioengine model. This, in turn, makes for a much more efficient system that requires less power than passive speakers and a separate integrated amplifier or similar A/V components. We build all this goodness into the left speaker cabinet to make it super-easy to connect your smartphone, tablet, computer, TV, network player or any other audio product.
Usb Power
The Audioengine A5+ includes a 5V, 500mA USB power supply for charging portable devices, while listening to your music. The USB connector allows you to charge and power your Smartphone, Tablet, Audioengine wireless adapters or any other USB powered product. USB is for power only, not USB audio or data transfer.
Amplifier Design
The amplifiers in powered Audioengine speakers are located in the left speaker and are a conservatively-rated class A/B analog monoblock design. This is a more traditional speaker/amplifier marriage which provides excellent quality audio and greater flexibility. All circuit boards for the power and preamp sections are vertically mounted for maximum mechanical shock protection.
Driver Designs
Audioengine uses audiophile-quality, ferrofluid-cooled silk dome tweeters with neodymium magnets. Silk tweeters hold up well under high power and the edge-driven design gives very smooth response. The woofers are aramid fiber woven glass composite with rubber surrounds. Aramid fiber is obviously very strong, which means that the woofer retains its shape when being driven at high levels. The speaker materials and construction are robust enough to stand up to some serious thrashing, so speaker grills are not needed and they will sound and look great after many years of use.
Power Transformers
Power transformers are a large contributor to the overall audio performance, especially in the low end. Again, no off-the-shelf parts. Audioengine uses gapless core toroidal transformers which have a tighter radiated magnetic field, directly translating to lower noise. They are lighter than standard, lower-cost transformers and also generate less heat.
Shielding
Both drivers are directly video shielded and allow the user to place the speakers within a few inches of a video monitor. This shielding also offers protection for hard-drive digital music players.
Quickstart Guide
A5+ Classic Quick SetupStep 1 – Speaker Placement
Although your Audioengine 5+ speakers are very forgiving with regards to placement, it’s true that proper speaker placement can have an impact on sound quality. There seem to be different theories on correct speaker placement but rooms and tastes are different so it’s difficult to recommend a perfect setup. We do suggest you feel free to experiment to see what works for you. As a general rule of thumb for the best soundstage and imaging, the speakers should be equidistant from side walls and a different distance from rear walls. Tweeters should be at about eye-level in your most frequent listening location and for the best bass response we recommend at least 6 inches of clearance between the rear of the speakers and the wall behind them. Here are a few more suggestions, assuming you have some exibility regarding where you place your speakers. No need for concern if your situation and listening environment dictate the speakers’ position.
• Both speakers should be equidistant from your primary listening position.
• Placing the speakers at least 6 feet (1.8m) apart usually provides the best imaging.
• Try to keep the speakers near the front edge of shelves or cabinets.
• Allow at least 6 inches of clearance between the rear of the speakers and the wall or surface behind them.
• If you need to turn the speakers on their sides, position the tweeters toward the outside.
• If used on a desktop for computer speakers, it’s best if they are placed on a solid surface
Step 2 – Connecting the Speaker Wire
The Audioengine 5+ speakers have amplifiers built into the left cabinet and the included speaker wire is used to connect both speakers to each other. The A5+ uses high quality, ve-way gold plated binding posts that will accept heavy gauge bare wire, banana plugs, spade lugs, or pin terminators.
1) Use your thumb and finger to unscrew the binding post connectors on the back of each speaker.
2) Insert each speaker wire into the holes on the side of binding post connectors, making sure to connect the positive (+) terminal on the left speaker to the positive (+) terminal on the right speaker.
3) Retighten the binding posts with your ngers.
4) Verify that only the exposed portion of the speaker wire is secured rmly in each connector.
5) Make sure that none of the speaker wire strands have come in contact with an adjoining terminal.
Note:
As the Audioengine 5+ speaker system includes built-in power amplifiers, do not connect the speaker terminals to the speaker outputs of a stereo receiver or amplifier.
Step 3 – Connecting the Power Cord
1. Verify that the power switch on the left speaker rear panel is in the OFF position.
2. Conrm that the rear panel voltage selector switch is set to the proper voltage for your area.
3. Connect the power cord into the left speaker and the other end into an AC power outlet.
Step 5 – Operation
1. Move the A5+ rear panel power switch to the ON position. The left speaker front panel power indicator should ash a few times then go solid.
2. Turn on your audio input source and adjust the volume to the desired listening level.
3. Adjust the A5+ speaker volume level with the volume knob on the front panel or with the included remote control.
For the full setup guide, download the attached PDF:
A5_plus setup guide_web
A5+ Classic Setup Video
Troubleshooting
A5+ Classic Troubleshooting TipsThe following troubleshooting tips can help diagnose and correct most concerns with the A5+ Classic. We have attempted to make this list as comprehensive as possible, so some of these may not apply to your issue, but please go through each tip.
If the power indicator on the A5+ front panel is not illuminated, then try these tips:
- Verify that the AC power cord is connected to the speaker rear panel and to a working AC power outlet.
- Check that the speaker’s power switch is in the ON position.
- Check that the rear panel voltage selector matches the operating voltage in your country or region.
- If there is still no power, check the fuse in the rear panel. If the fuse is blown and needs to be replaced it is important to replace with same fuse type and value.
If the front panel indicator light is on but you are experiencing an audio-related or other issue, try these tips:
- Power-cycle the speakers by switching them off and back on using the power switch on the rear panel.
- Be sure the speakers are not in MUTE or SLEEP mode (if so, the front panel indicator light will be flashing).
- Check that the cables from your audio sources to the speaker are properly connected. Confirm by unplugging the audio cables and then reconnecting. Try using as many different inputs and input sources as possible to see if the problem follows.
- Check speaker wire connections from the left (powered) speaker to the right (passive) speaker. Confirm by removing the speaker wire from on each speaker and reconnecting. Also check speaker wire polarity by verifying that the wires are going to same terminals on both speakers.
- Verify that your audio input source components or devices are all powered on and the volume levels are turned up.
- If using a computer, verify that the audio output balance setting is centered for the OS and all apps.
- Make sure the speakers are not too close to a wall or other obstruction, which could limit bass output.
- Decrease the volume level of the audio input source and increase the volume of the speakers.
- If you are using a wireless adapter, preamp, or external DAC with these speakers, remove these (temporarily) and connect the audio source directly to the speakers.
- If your input source has its own EQ or other sound settings, make sure they are all temporarily turned off.
- Also try moving the speakers to a different location to see if something is causing interference in the current location. Something as simple as a wireless internet router, cordless or mobile phone, or halogen lamp near the speakers can all cause interference.
A5+ troubleshooting tips – remote control
Remote control is not working or remote range is reduced.
- Make sure nothing is blocking the remote control receiver, which is in the left powered speaker.
- Check the remote battery to be sure it is installed correctly.
- Replace the battery with another CR2025 battery